How to Switch Your iOS App and Scene Delegates for Improved Testing
Introduction
By default, when Xcode runs unit tests it uses your main app target as a host application and effectively injects your test code into your app at run time. This makes it easy for your unit tests to refer to types and methods that are defined in your app. A side effect of this process is that every time you run your unit tests, the host application will execute its usual startup sequence, invoking the various app delegate methods and building the initial user interface (either in code or creating it from a storyboard).
That setup should not be necessary when running unit tests. It might even be undesirable as it could interfere with your tests by, for example, creating some objects with real dependencies instead of mocks or by initiating network accesses etc.
Even if there are no clashes with your tests, the code that the main app delegate executes and the user interface it builds simply makes tests take longer to run. We want our tests to run as quickly as possible to ensure we get fast feedback and to resist the temptation to avoid running them regularly. This is especially important if you follow a test-driven-development approach.
One solution to this problem is to add code in the app delegate to somehow check if the app is being launched for unit tests and skip the usual initialisation code. That can be made to work but if you use a storyboard for your initial user interface, that will still be initialised. This approach is messy and pollutes your main app delegate with test code. There is a better way.
Using a Test-Specific App Delegate
A few years ago I came across an article by Jon Reid titled “How to Switch Your iOS App Delegate for Improved Testing.” Jon describes a way to avoid executing the app’s usual startup/initialisation code when running unit tests. A conditional check is made very early in the lifecycle of the app (in main.swift) and uses a test-specific app delegate when the app is being launched to run unit tests. It is a simple and effective way to bypass the usual initialisation process for your app when running unit tests and does not require any changes to your main app delegate.
This technique worked very well until iOS 13 added the concept of scenes, the scene delegate, and a modified app life cycle. I’m not going to explain scenes here. Other people have written about this. Donny Wals, for example, has a great blog post about scenes: Understanding the iOS 13 Scene Delegate.
By the same reasoning that led to a test-specific app delegate, we would like to use a test-specific scene delegate when running unit tests. In this article I’m going to explain how to build upon Jon’s technique to apply it to the scene delegate, highlight a frustrating problem, and provide a workaround to that problem. I also explain how to extend the technique back to earlier iOS versions if you still need to support the older app-delegate-based lifecycle.
Sample Project
The simplest way to demonstrate the technique is to apply it to a sample iOS 13 project. I will describe the steps needed to add test-specific app and scene delegates to Xcode’s Single View Application template. You should then be able to apply the same technique to your own projects.
You can download a completed sample project from GitHub. There are separate commits for each significant step in the process. You can use the git command line or a Git client (I use Atlassian’s SourceTree) to switch to specific commits or to examine the code changes for each step. I also link to the changes for individual commits so you can view the differences on GitHub.
The code in this article is in Swift but I have also created an Objective-C version of the sample project with equivalent code changes.
Create a Single View Application
To make use of iOS 13’s scene-based app lifecycle we need to be using at least Xcode 11. At the time of writing, the current released version of Xcode is 11.3.
Open Xcode and select File->New->Project. Choose the iOS Single View App template:

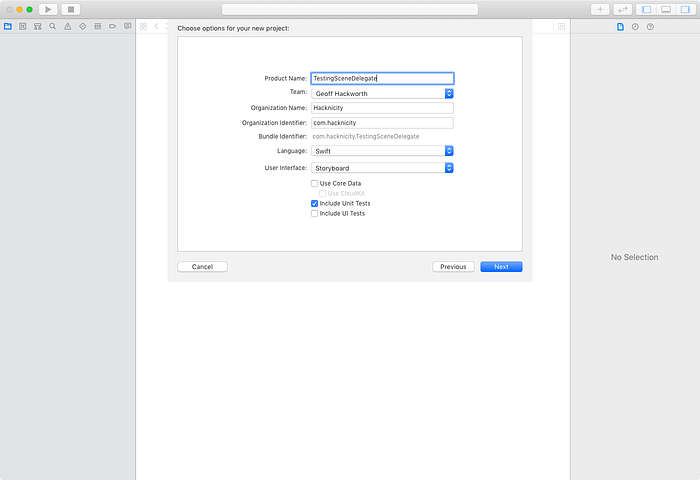
Choose “Next” and give your project a name. I used TestingSceneDelegate. Ensure that the language is Swift, the user interface is configured to use a Storyboard, and that “Include Unit Tests” is checked:
Choose “Next” and save your project somewhere. Check “Create Git repository on my Mac” if you want to enable source control.
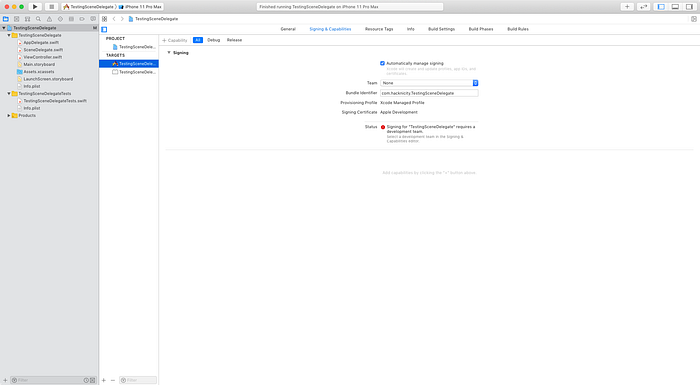
In my sample project I removed my own Team name from “Signing & Capabilities” tab for both the app and unit test targets. That should allow the sample project to run in the simulator for anyone. You should not do this if you are creating your own sample project. If you are using my sample and have problems, or would like to run on a real device, then you will need to change the project settings to use your own team for both targets:
The first commit in my sample project corresponds to this initial state.
Add a Label to the App
If you run the app with ⌘R you will see an empty white screen. If you run unit tests with ⌘U you will see Xcode briefly launch your app (and show its white screen) before returning to the home screen. The Xcode template created two empty tests in TestingSceneDelegateTests.swift. We don’t care about the actual tests for the purposes of this article; we only want to change how tests are run.
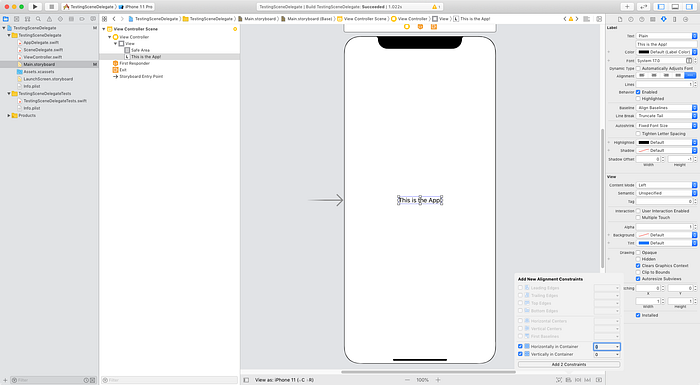
In order to make it clear when the app’s own delegate and storyboard are being used, add a simple label to Main.storyboard titled “This is the App!” Create constraints to centre it horizontally and vertically in its containing view:
Now when you run either the app or the unit tests you will see the label:
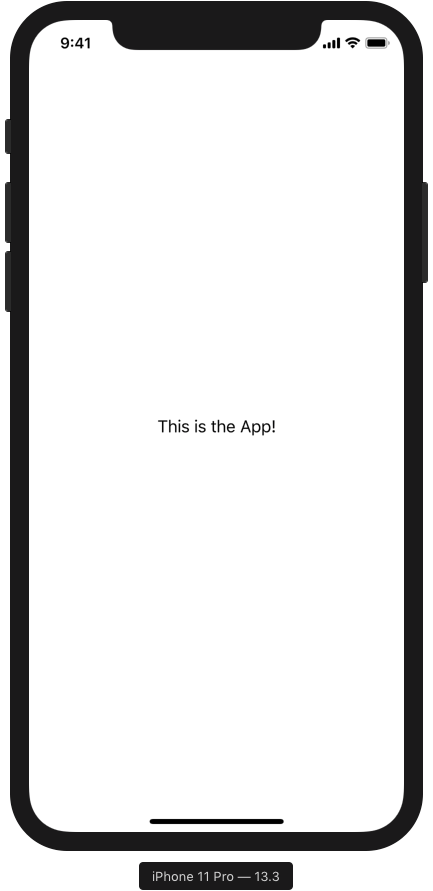
The second commit in my sample project has the changes from this step.
Add Test-Specific Delegates
This is where the real works happens and a number of code changes have to be made. We first need to apply Jon’s technique to create a test-specific app delegate. His article was written in a pre-iOS 13 world and there are some small differences to make it work with scenes. This is because the scene delegate, and not the app delegate, is responsible for owning the window in an app that uses the new scene-based lifecycle. We will also need a test-specific scene delegate.
Add a Test-Specific App Delegate
We need to cause the app to use a test-specific app delegate when it is being launched to run unit tests. That happens in main.swift. Swift apps don’t usually have a main.swift file, so we need to add one.
Select File->New->File… (or press ⌘N) to add a file named main.swift. Ensure it is added to the main app target, not the unit test target.
This code looks for the existence of a TestingAppDelegate class at runtime and, if it cannot be found, falls back to the app’s own AppDelegate class. TheTestingAppDelegate class will only exist when running unit tests. This is how the app switches at run time between using the usual or test-specific app delegates. The UIApplicationMain method is used to run the app with the appropriate app delegate and passes along any command line arguments (some Xcode scheme settings result in arguments being passed to the app).
In order to make iOS execute our new main.swift code we must remove the @UIApplicationMain annotation from the AppDelegate class:
Add a TestingAppDelegate.swift file to the unit test target:
The @objc annotation ensures that the class name is exposed to the runtime with the exact name that the code inmain.swift is checking for.
The _:didFinishLaunchingWithOptions: delegate method does nothing. This is how we bypass any initialisation code that the main app delegate might execute (which, in this trivial sample app, is also nothing).
The _:configurationForConnecting:options: delegate method creates a new UISceneConfiguration for a test-specific TestingSceneDelegate class. We don’t configure a storyboard as we’re going to create a window in code.
The Scene Configuration in the app’sInfo.plist file refers to Main.storyboard. The initial view controller class (ViewController) in the storyboard will be created (i.e. its awakeFromNib method is called) even though our testing scene delegate creates its own window and doesn’t use that view controller. The view controller’s viewDidLoad will not be called (since we don’t show it). Setting sceneConfiguration.storyboard to nil ensures ViewController isn’t even created. [Thanks to Andrii Kum for pointing this out in a comment on the article.]
Contrast this implementation with the main AppDelegate class which uses a different UISceneConfiguration initialiser to create the configuration from the Application Scene Manifest section of the app’s Info.plist. That configuration is how iOS knows to use the SceneDelegate class and Main.storyboard when running the main app target.
Add a Test-Specific Scene Delegate
Add a TestingSceneDelegate.swift file to the unit test target:
The test scene delegate is responsible for creating the window. Note that we have to use the UIWindow initialiser which accepts the UIWindowScene object.
To make it clearer that the test-specific delegates are being used I like to add a simple placeholder view controller that shows a “Running unit tests…” message. Add a TestingRootViewController.swift file to the unit test target:
This creates a view controller whose view is simply a label reading “Running Unit Tests…” Windows are black by default (in both light and dark appearances), so we need to make the label’s text white.
The third commit in my sample project includes all the changes for this step except for one small fix to ensure the view controller is not instantiated. That fix is in this commit.
Run the Unit Tests
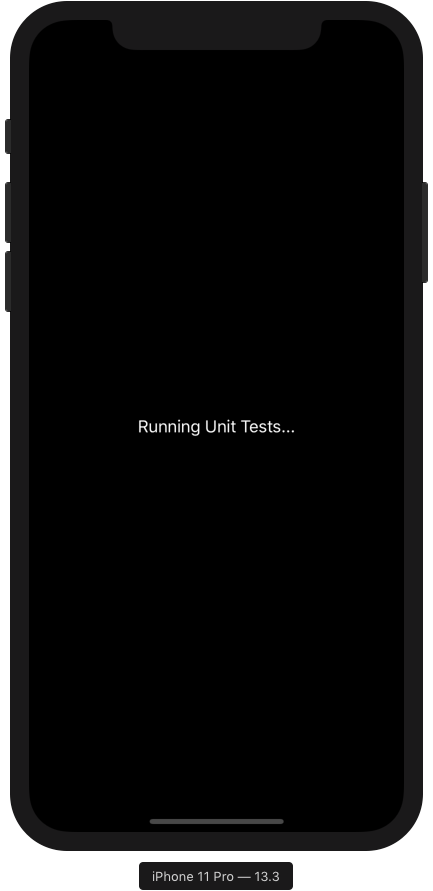
Run the unit tests again using ⌘U and you should briefly see the “Running Unit Tests…” text on a black background as the tests are run:
If you see the “This is the App!” message from the app’s Main.storyboard then you’ve discovered a problem with this technique. Read on for an explanation of the problem and how to work around it.
The Scene Configuration Caching Problem
The app delegate’s _:configurationForConnecting:options: method is called when creating new scenes. As far as I can tell, that happens when:
- the app is first launched after installation
- a multi-window capable app on iPadOS is asked to open a new window
- a non-multi-window capable app is launched again after swiping to remove its window from the App Switcher
Unfortunately (for our purposes), iOS/iPadOS caches the scene configuration and will not call the app delegate method when relaunching the app. Instead, it tries to restore the most-recently-used scene configuration.
In practice this means that if you run the main app, AppDelegate will create a UISceneConfiguration referring to the app target’sSceneDelegate. When you next run unit tests, the code in main.swift will correctly use the TestingAppDelegate but iOS will use its previously-cached scene configuration and use SceneDelegate instead of TestingSceneDelegate.
Re-installing the app or, for an app that doesn’t support multiple windows, removing its window from the App Switcher, seems to reset this scene configuration cache. The next time the app is launched, either to run it directly or to run unit tests, the app delegate will be asked for a scene configuration. If running unit tests, that means TestingAppDelegate will provide a scene configuration referring toTestingSceneDelegate. That scene configuration will be cached and will continue to be re-used each time unit tests are run. Great!
However, the next time the main app is run, iOS will not be able to use the cached scene configuration because it refers toTestingSceneDelegate. That class doesn’t exist when running the main app. iOS then falls back to asking the app delegate to provide a scene configuration. That will be the main target’s AppDelegate because the code in main.swift won't find TestingAppDelegate either (since we’re not running unit tests in this scenario). That configuration will be cached for future launches of the app.
To summarise, each time the main app target is run, the scene configuration cache is effectively “polluted” with a reference to SceneDelegate. Each subsequent launch, even when main.swift launches the app withTestingAppDelegate, will use SceneDelegate. This pretty much defeats the entire purpose of what we’re trying to achieve!
A Workaround to the Scene Configuration Caching Problem
We need to find a way to force iOS to always use TestingSceneDelegate when running unit tests without having to re-install the app (or, for non-multi-window capable apps, removing it from the App Switcher).
While researching how to fix this issue, I found an article Replacing the SceneDelegate When Running Unit Tests by Timothy Sanders. Timothy has been reading a beta version of Jon’s upcoming iOS Unit Testing by Example book which includes a version of Jon’s original article on using a test-specific app delegate. Timothy describes essentially the same technique to extend Jon’s approach to iOS 13 (his code for creating the UISceneConfiguration is slightly different to mine). Timothy also discusses the scene configuration caching problem and offers some workarounds.
I based my own first workaround on his example. I modified SceneDelegate to make _:willConnectTo:options: destroy the scene if the app delegate was not AppDelegate (i.e. SceneDelegate was being used when the app was running unit tests). The first run of the unit tests after the main app had polluted the scene configuration cache would use the SceneDelegate, but subsequent runs of the unit tests would then correctly use TestingSceneDelegate. It was a hack and only worked for mutli-window-capable apps run on iPad.
I noticed a recent comment from codeman9 on Timothy’s article claiming there’s a private API method that can be used to remove the session from the cache. Could this be the workaround we’ve been searching for?
Narrator: it was!
Based on codeman9’s discovery I added a small amount of code to TestingAppDelegate to flush out any cached scene configurations early in the app launch process. This results in _:configurationForConnecting:options: always being asked to provide a scene configuration when running unit tests and, therefore, TestingSceneDelegate always being used:
This code is using private API so could stop working in the future. But it is completely App Store safe because it is in TestingAppDelegate, which is not part of the main app target.
With this workaround we have an almost fully working solution. Almost! I don’t fully understand exactly what is happening, but there is sometimes an issue running unit tests if the main app has been used to create multiple windows. I can reliably reproduce an issue if the main app had most-recently been used in a split with itself (i.e. two main app windows were visible simultaneously). The next run of unit tests seems to restore both main app scenes (i.e SceneDelegate) and didn’t actually execute any test code. Choosing a single window instance of the main app from the App Switcher, or removing the split, and then switching back to the home screen seems to fix this (it leaves the app’s most-recently used state as a single window). Manually removing the app’s windows from the App Switcher also works.
In short, if your app supports multiple scenes, ensure that it has not been left showing multiple windows before trying to run unit tests. It seems that iPadOS only saves the window configuration when you leave the app (either by switching to another app or to the Home Screen). Removing the split might not be enough to avoid this issue; you also need to send the app to the background to ensure that it is left in a single window state when the unit tests are next run.
The fourth commit in my sample project includes this workaround.
Support for pre-iOS 13
An app created with Xcode-11 uses the scene-based lifecycle by default. It won’t build if you change the project settings to support earlier iOS versions. There’s a great summary of the changes that are required to make an app created with Xcode 11 work with both the app- and scene-based lifecycles on Geek And Dad’s Blog: Making iOS 12 projects in Xcode 11.
For the sake of completeness I want to quickly discuss how to make the sample project also work on earlier iOS versions where the app delegate needs to be responsible for managing the window and the scene delegate is not used.
I created a pre-ios-13-support branch in my sample project that contains these changes. I didn’t want to over-complicate the master branch and the main part of this article with the code for supporting earlier iOS versions.
Project Settings
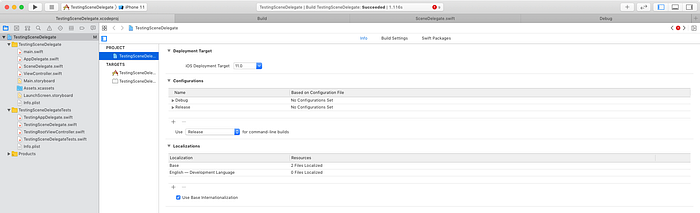
When Xcode 11.3 created the project, it assigned iOS 13.2 as the iOS Deployment Target. We need to change this to an earlier iOS version. I arbitrarily chose iOS 11 in my sample project. The app target implicitly inherits the setting from the project and so we can change its value in the Info tab for the project:
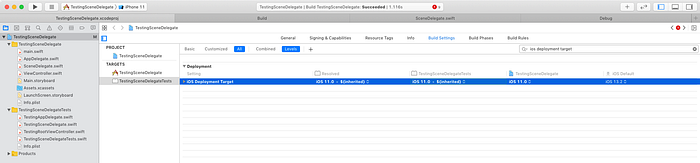
Unfortunately the TestingSceneDelegateTests target has a target-specific override (also initially set to iOS 13.2). I can’t figure out how to remove an override in Xcode’s Build Settings tab and I don’t want to try and explain how to manually edit the project.pbxproj file to remove it! We can either duplicate the iOS 11 value at the unit test target level or, slightly better in my opinion, choose “Other…” and enter ${inherited} to explicitly inherit the value from the project. To make it easier to find the correct setting, search for “ios deployment target”:
AppDelegate
To work prior to iOS 13, AppDelegate needs to have an optional window property and the UISceneSession lifecycle methods need to be marked as only being available on iOS 13:
The window property will be initialised automatically because the sample app uses Main.storyboard for its user interface. If you create your window programatically in the scene delegate on iOS 13, you will need similar code to do that in the app delegate to support earlier iOS versions. That code will need to be in the else clause of an if #available(iOS 13, *) check so that it is not executed on iOS 13.
TestingAppDelegate
TestingAppDelegate also needs an optional window and its UISceneSession lifecycle method marked as only being available on iOS 13. The workaround code to flush the scene configuration cache needs to be enclosed in an if #available(iOS 13, *) check. Since we’re not using a storyboard when testing, prior to iOS 13 TestingAppDelegate needs to create its window programatically. Note that we need to use the default UIWindow initialiser prior to iOS 13.
As described earlier, I also like to use TestingRootViewController to show a “Running Unit Tests…” message to make it very clear that the test-specific delegate is being used when running unit tests:
SceneDelegate and TestingSceneDelegate
Since they are only used on iOS 13 we need to mark SceneDelegate and TestingSceneDelegate as only being available on iOS 13:
After making these changes, both the app and unit test targets should now work on iOS 11 through 13.
Conclusion
Using test-specific app and scene delegates allows our unit tests to skip executing any initialisation code and user interface configuration that the main app target performs on launch. That makes our unit tests run more quickly, which can only be a good thing!
Other Articles That You Might Like
I have written a comprehensive article on the View Controller Presentation Changes in iOS 13.
As an iOS developer you might be interested in my long-running series of articles which show how apps adapt to newer device sizes depending on the Xcode version they are built with:
- How iPad Apps Adapt to the New 10.2" iPad
- How iPad Apps Adapt to the New 11" and 12.9" iPads Pro
- How Apps Adapt to the Series 4 Apple Watch Screen Sizes
- How iOS Apps Adapt to the iPhone XS Max and iPhone XR Screen Sizes
- How iOS Apps Adapt to the iPhone X Screen Size
The screenshots in those articles were taken from the iOS simulator running my Adaptivity iOS app. The app helps developers and designers visualise how iOS’s Size Classes and margins for layout, readable content and the safe area look on real devices and how they change with respect to orientation, iPad Slide Over/Split View and Dynamic Type size changes. There are also screens to explore System Colors, System Images and System Materials. There is more information and screenshots on my website about Adaptivity’s features.
You may not have realised that there were iPad Navigation Bar and Toolbar Height Changes in iOS 12.
I have also written about External Display Support on iOS,Working with Multiple Versions of Xcode and how to Hide Sensitive Information in the iOS App Switcher Snapshot Image.
If you found any of these articles helpful then please take a look at my apps in the iOS App Store to see if there’s anything that you’d like to download (especially the paid ones 😀).
If you work with a lot of Xcode projects you might like my Mac Menu Bar utility XcLauncher. It’s like having browser bookmarks for your favorite Xcode projects, workspaces and playgrounds. There is more information on my website about XcLauncher’s features.